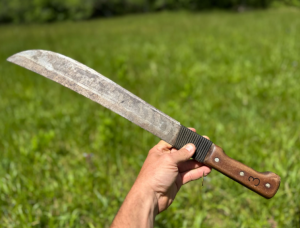
There’s something special about a tool you’ve made or modified with your own hands. I’m not talking about buying a high-end blade with tactical etching and a price tag that makes your wallet cry. I’m talking about grabbing a $20 Tramontina machete, rolling up your sleeves, and turning it into something you can count on in the woods, in the yard, or when everything goes sideways.
If you’ve got some sandpaper, a file, a little linseed oil, and a willingness to get your hands dirty, you can take a cheap machete from blister factory to bushcraft-ready.
Let’s walk through exactly how I do it.
Right out of the box, the Tramontina machete is rough. It comes dull, like run-your-hand-along-the-blade dull. The kind of dull that makes you question if it’s even a cutting tool. It’s coated in a polyurethane clear coat to prevent rust, but honestly, it makes it look and feel like a cheap kitchen spatula. The handle? Also not winning any awards. It’s bulky, rough, and will rub your palm raw in no time.
But here’s the good news. That roughness? It’s opportunity. It’s like buying a fixer-upper with great bones. All it needs is a little care.
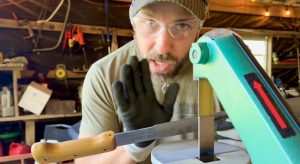
If you're more visual then watch the full video here. https://www.youtube.com/watch?v=6Yj1EXKS61U
Here’s what I use to turn this machete into something you’ll love:
This is where most of the comfort comes from. Start with the rasp file to shape and contour the wood. That raised edge on the handle? It’s going to eat into your hand until either the machete breaks in or your hand gives up. Take that extra wood down to the tang using the flat side of the rasp. Once you’re close, switch to the finer side and then hit it with sandpaper.
Start with 80 grit, then move to 120 grit to finish. You don’t need a fine furniture finish. You just want smooth, rounded contours. Something that feels like it belongs in your hand, not something that makes you dread using it.
Pro tip: 120 grit is perfect. Any smoother and it starts getting slick when wet. And if you’re swinging this thing in the rain, that matters.
Get rid of that factory clear coat. It’s not doing you any favors. You can file it off or hit it with a wire brush or belt sander. I like to get down to bare steel so I can do a forced patina later and let the blade age naturally over time.
This part takes a little patience, but when you see that raw steel come through, it’s worth it.
The factory spine won’t do much for scraping a ferro rod or processing bark. So I clean it up on the grinder to give it a crisp, sharp 90-degree edge. Now it throws sparks, scrapes tinder, and earns its keep.
I like to grind off part of the blade near the handle so I can wrap it with paracord. This lets me choke up for finer tasks like controlled chopping or carving. It also gives me some emergency cordage if I need it.
Wrap about six feet of 550 paracord tight around the area and secure it with a loop tuck method. If you’re picky like I am, you’ll make sure every wrap is straight and tight. Melt the ends so it doesn’t fray, and you’re good.
Drop that cleaned-up handle into a jar of boiled linseed oil and let it soak. Five minutes is usually good. This fills the pores, tightens up the grain, and leaves you with a rich honey-colored finish that feels incredible.
Wipe off the excess and let it dry. Trust me, it’s going to look and feel like a whole different tool.
Factory edge is a rough Scandi grind. It’s okay, but it’ll roll or chip with hard use. I prefer a convex edge—it’s tougher, holds longer, and doesn’t demand laser precision when sharpening in the field.
To do this, remove that hard line at the start of the grind. Gently round the bevel so the edge transitions smoothly. Then take your wet stone and hone it. No pressure, just let the machete’s weight do the work. Watch for the slurry—that’s when you know it’s working.
The convex shape makes it easier to maintain and more durable in the long run.
Here’s where it gets fun. Smear yellow mustard all over the bare blade in a swirl or tiger-stripe pattern. Let it sit for 30 minutes. The vinegar and salt in the mustard react with the steel, leaving a gnarly patina that helps prevent rust and adds character.
Wipe it off and admire the result. It gives the blade a lived-in, camo-style look. And the best part? With use, it’ll age even better.
Using your wet stone or diamond stone, finish sharpening until it shaves hair. Five minutes on the stone and a quick finish with the 1600 grit diamond stone will get it razor sharp.
The sheath that comes with the Tramontina? Not bad. It has a nylon exterior and some plastic rigidity inside, but the Velcro strap is junk. Cut it off, clean up the ends with a lighter, and rely on friction fit—especially with the paracord wrap added.
Velcro just doesn’t last in the field. Dirt, water, and wear will ruin it. Go friction fit and move on.
Let me know in the comments if you are going to try out this project.

This isn’t just a machete anymore. It’s your machete. You shaped it, tuned it, sharpened it, and turned it into something dependable. It’s the kind of project that makes using it that much more enjoyable.
Whether you’re clearing a trail, trimming trees, or living out of a bug-out location, this blade’s got your back. It’s not flashy. It’s not expensive. But it’s tough, tested, and totally yours.
Stay sharp.
Stay ready.
Go On Three!
Jason Salyer (On Three)
P.S. Forward this newsletter to someone who loves to save money!
Check Out My Recommended Gear & Supplies
Explore the gear and supplies I personally use and trust. When you purchase through my Amazon storefront and other affiliates, I earn a small commission at no extra cost to you. These small commissions help support the creation of informative, free content for you to enjoy.
Sign up for emails to get bug in and bug out information, practical prepping, survival tips, gear reviews and uncomfortable moments that lead to growth.
© 2025 goon3.com | The Reality Check Newsletter

 Optimized by Seraphinite Accelerator